How to Use a Dedicated DMARC Analyzer Service to Set Up DMARC with p=reject (Full DMARC Implementation)
This tutorial provides step-by-step instructions on how to set up DMARC starting from p=none, transition to p=quarantine, then to p=reject using DMARCLY, a dedicated DMARC analyzer service.
The tutorial assumes no prior knowledge whatsoever of DMARC or DMARC reports. You only need basic DNS know-how to publish domain records in the DNS.
Why use a dedicated DMARC analyzer service?
Granted that you can manually parse incoming DMARC reports to identify email streams, many companies/IT departments choose to use a dedicated DMARC analyzer service for this purpose.
The reason is simple: while manually parsing daily DMARC reports takes up to days depending on your email volume, a dedicated DMARC analyzer service does this for you in no time.
In addition, a dedicated DMARC analyzer service enables you to look into the data from various dimensions, so that you can identify legitimate email streams and potential threats at a glance.
To use DMARCLY, a DMARC analyzer service, to fully implement DMARC, please follow the steps below.
Sign up for DMARCLY
Navigate to Sign Up for DMARCLY to create a FREE 14-day trial account.
Upon signing up, DMARCLY prepares 2 mailboxes for you to receive DMARC aggregate reports and failure reports. Also, it keeps watching these inboxes and parses them as they come in.
This removes the hassle of your having to set up your own mailboxes to receive the reports, external domain verification (EDV), etc. and ongoing maintenance.
Create a DMARC record
Log in to the DMARCLY dashboard here, the go to: DNS Records->Publish DMARC Record.
Now you will see a page with a default DMARC record created for you already, as highlighted below:
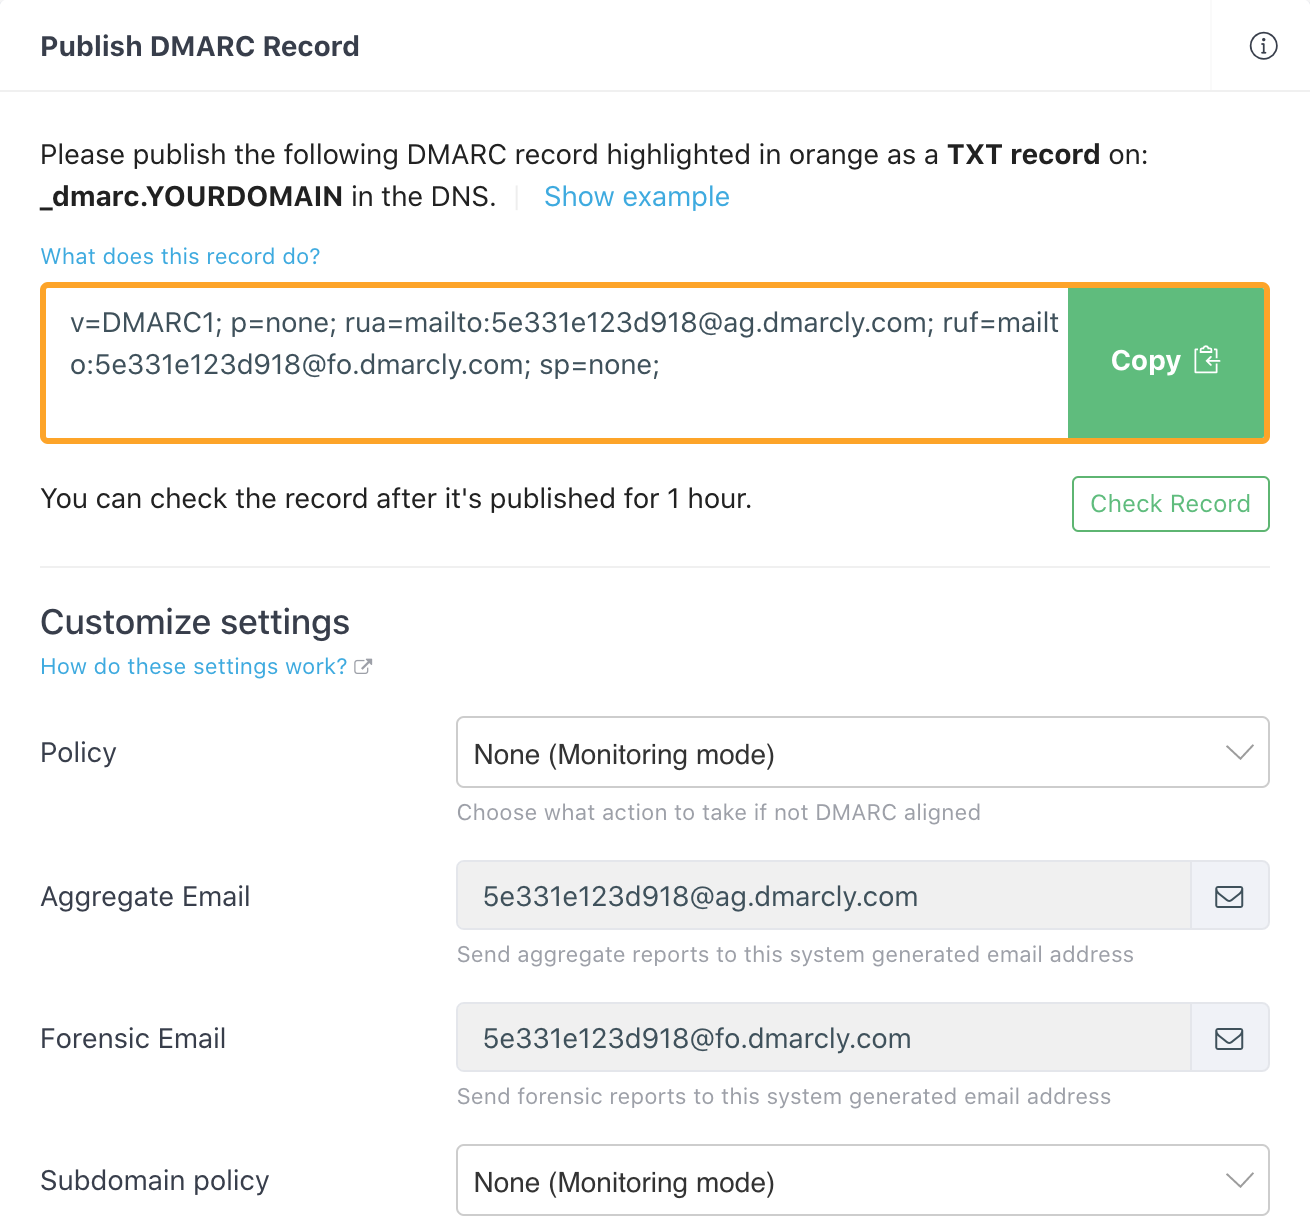
If you are just getting started, you can simply use the default DMARC record. Of course you can adjust the settings on that page and update the record to suit your needs.
We recommend that you publish the record as is, as its settings cover most common scenarios. This sets DMARC under the "monitoring" mode which allows you to start receiving DMARC reports without having any impact on your email streams.
You can always come back later and update the DMARC settings when you get more familiar with DMARC.
Publish the DMARC record
Now publish the DMARC record on your domain in the DNS, so that it's accessible to receiving email servers. To do that, you need to log in to the domain's DNS provider's dashboard to add the record.
Here are a few links to tutorials on adding a DMARC record with various DNS services:
- How to add DMARC record in GoDaddy
- How to add DMARC record in Cloudflare
- How to add DMARC record in Namecheap
- How to add DMARC record in cPanel
Check the DMARC aggregate data
A couple of days later, the DMARC aggregate data should be readily available in DMARCLY's dashboard. Simply log in and go to: Aggregate Reports, then you can view it from various tabs (dimensions).
In the rare case that you are not seeing any aggregate data, check out this post: Why Am I Not Receiving DMARC Aggregate or Forensic Reports?
Go to the Unaligned Sources tab, where it shows all the emails streams that have failed email authentication in the past. You need to go through all the items in the table, identify all the legitimate email streams, and set up SPF and DKIM for them.
For example, the first row in the following table:
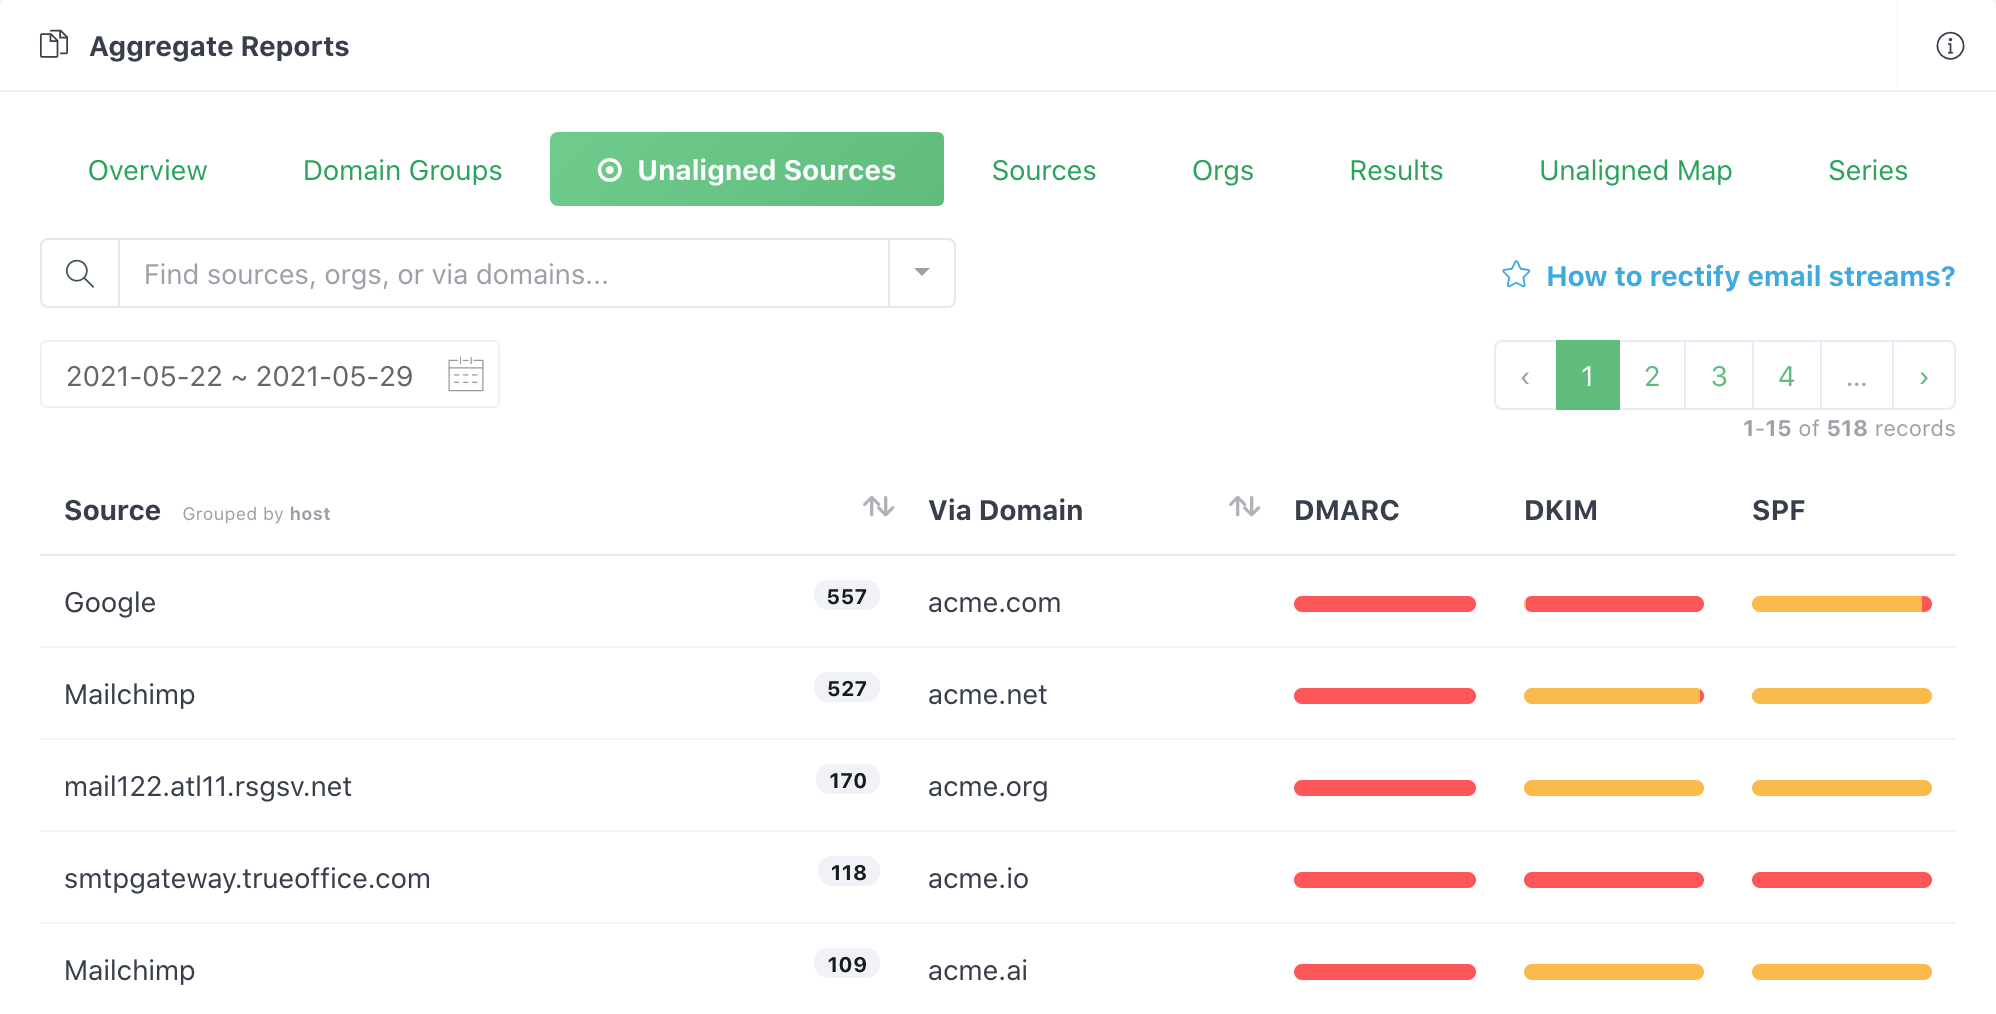
shows that Google is the email delivery service (source) for that particular row (email stream), and the emails in this stream are not authenticated.
Now you need to consult your IT department to find out if Google is a legitimate email delivery service for your company:
- if so, set up SPF and DKIM for Google;
- otherwise, leave everything as is: emails delivered by illegitimate email sources will be quarantined or rejected as you transition to the next DMARC modes.
To set up SPF and DKIM for an email delivery service xxx, simply Google "xxx SPF" and "xxx DKIM".
Setting up SPF and DKIM for a particular email delivery service is called "authenticate for that service".
Repeat this process for all other rows in the table.
Record fields
Each row in the table under the Unaligned Sources or Sources tab represents a group of emails. Clicking a row reveals detailed information about that particular group of emails.
Below is what each field indicates:
- Source Host. The host from which these emails were sent; this is the value returned by a reverse DNS lookup on the Source IP;
- Source IP. The IP address of the host from which these emails were sent;
- Reporting Organization. The mailbox service provider (Gmail, Yahoo, etc.);
- DMARC Identifier. The domain found in the RFC5322.From field. It comes from feedback->record->identifiers->header_from in the DMARC report;
- SPF Domain. The domain found in the RFC5321.From field in the SMTP transactions. It comes from feedback->record->auth_results->spf->domain in the DMARC report;
- SPF Scope. The field used to calculate SPF Domain. It can be one of:
- "mfrom", the email address of the sender that shows up in the MAIL FROM SMTP command;
- "helo", the domain name supplied to the HELO SMTP command.
- SPF Result. The SPF check result. Refer to: Why SPF Authentication Fails.
- DKIM Domain. The domain found in the d= tag in the email headers. It comes from feedback->record->auth_results->dkim->domain in the DMARC report;
- Disposition. The disposition of the emails with these possible values: none, quarantine, reject, and multiple;
- Policy Override Reason. The reason the DMARC policy action is overridden on the email server. These are the possible values:
- forwarded. The message was relayed via a known forwarder, or local heuristics identified the message as likely having been forwarded. Therefore, authentication was not expected to succeed;
- local_policy. The email receiver’s local policy exempted the message from being subjected to the domain owner’s requested DMARC policy action;
- mailing_list. Local heuristics determined that the message arrived via a mailing list, and thus authentication of the original message was not expected to succeed;
- sampled_out. The message was exempted from the DMARC policy action by the "pct" setting in the DMARC policy record;
- trusted_forwarder. Message authentication failure was anticipated by other evidence linking the message to a locally maintained list of known and trusted forwarders;
- other. Some policy exception not covered by the other values in this list occurred. Additional detail can be found in the Policy Override Comment field below.
- Policy Override Comment. The additional detail about the DMARC policy override, when Policy Override Reason is "other";
- Last Sent. The date when the last email was sent;
- Via Domain. The domain which these emails were sent on behalf of;
- Volume. The number of emails in the group.
The downloadable CSV file contains these extra fields:
- ARC. Preserved Authenticated Received Chain (ARC) authentication result, if any. Refer to: What is Authenticated Received Chain;
- Disposition Count. The number of types of disposition of the emails in the group;
- DMARC Aligned. The number of emails that were DMARC aligned;
- DMARC unaligned. The number of emails that were DMARC unaligned;
- DMARC Unaligned ARC Pass. The number emails that were DMARC unaligned but carried an ARC pass;
- DKIM Aligned. The number of emails that were DKIM aligned;
- DKIM Authenticated. The number of emails that were DKIM authenticated;
- DKIM Failed. The number of emails that were DKIM failed (signature verification failed);
- SPF Aligned. The number of emails that were SPF aligned;
- SPF Authenticated. The number of emails that were SPF authenticated;
- SPF Failed. The number of emails that were SPF failed (IP check failed).
Transition to p=quarantine mode
Once you've authenticated for all known legitimate sources, you need to wait some time (1+ month) before moving to DMARC's quarantine mode. This allows you to check incoming data to identify more legitimate sources.
Moving to DMARC's quarantine mode is nothing more than updating the DMARC policy to quarantine in your DMARC record in the DNS.
Transition to p=reject mode
If you haven't found any issue in the quarantine phase for some time, you can consider moving to the reject mode. The time it takes before moving to the reject mode depends on the complexity of your organization: the more complex it is, the longer it takes. It typically takes 3+ months, so that you have enough time to identify all legitimate sources in your organization.
It's very important that you authenticated for all legitimate sources before moving to p=reject, as in this mode, all unauthenticated emails will be rejected!
To move to DMARC's reject mode, update the DMARC policy to reject in your DMARC record in the DNS.
Ongoing monitoring
From now on, you need to keep monitoring your email authentication status, in case any change in your email infrastructure causes emails from legitimate email delivery sources to not authenticate.
Your development/marketing team can add new email delivery sources, in which case, you need to authenticate for such new sources.
Email delivery sources can also become obsolete, in which case, you need to remove the corresponding SPF and/or DKIM records on your domain, so that emails coming from these sources don't authenticate.
You can use DMARCLY's DMARC Summary feature to receive email authentication status reports in your inbox. By reviewing these periodic reports, you can stay on top of your email authentication status.
Protect Business Email & Improve Email Deliverability
Get a 14 day trial. No credit card required.
Create Account