What is BIMI: BIMI Explained.
This article explains what BIMI is, how to implement it to increase email credibility, boost engagement rate, and improve email deliverability and open rates.
What is BIMI?
BIMI, short for Brand Indicator for Message Identification, allows domain owners to coordinate with email clients to display brand logos next to authenticated email messages.
Why BIMI?
Without BIMI, email clients display a generic placeholder logo with brand initials. The recipient might have a hard time recognizing your brand without resorting to the brand name.
However, with BIMI implemented, the brand logo is displayed next to your email message, boosting brand awareness.
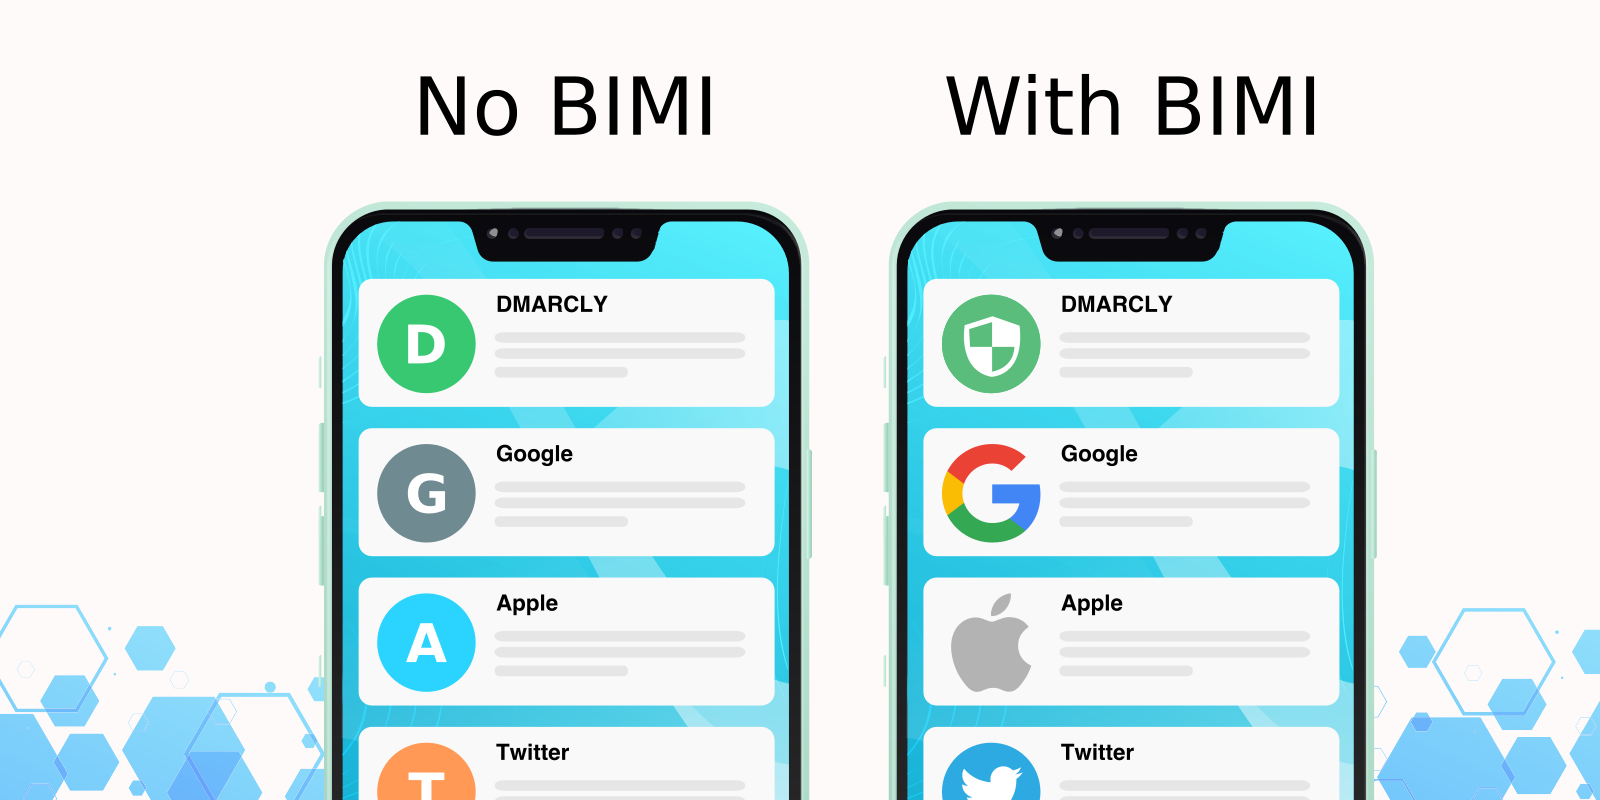
A comparison between email message without BIMI enabled and with BIMI enabled can be see from below:

As you can see from the illustration, on the left where BIMI is not enabled, a generic logo is displayed, which is not very interesting. However, on the right where BIMI is enabled, a brand logo appears next to the email message, instantly boosting trust and invites the recipient to open the message.
Here is what an email message with a trusted brand logo looks like, when BIMI is enabled:
![]()
In contrast, an email message sent from a domain without BIMI implemented displays no brand logo:
![]()
Obviously, BIMI helps build/increase brand awareness and user trust, and consequently boosts engagement rate, which ultimately improves email deliverability.
Prerequisites for BIMI
Since brand logos are displayed only for authenticated messages, you need to set up SPF, DKIM and DMARC first.
To set up SPF, DKIM and DMARC on your domain, refer to our ultimate guide.
In addition, make sure your DMARC policy is either p=quarantine or p=reject.
Once these requirements are met, you can proceed to implement BIMI.
How to implement BIMI?
Implementing BIMI on your domain takes these steps:
- register a trademark for the brand logo;
- buy a Verified Mark Certificate (VMC);
- upload the VMC to your server;
- upload your brand logo;
- create a BIMI record;
- publish your BIMI record in the DNS;
- check the BIMI record to ensure success.
We will walk through the steps in detail below.
1 Register a trademark for the brand logo
Some mailbox service providers like Gmail require a Verified Mark Certificate (VMC) for a BIMI implementation. Before you buy and set up a VMC though, you must register your brand logo as a trademark with an intellectual property office recognized by VMC issuers like DigiCert and Entrust.
You can search for your brand logo on this Brand Database run by World Intellectual Property Organization (WIPO).
2 Buy a VMC
Once your brand logo is registered as a trademark, you can navigate to one of the following VMC issuers' websites to acquire a VMC: DigiCert and Entrust.
During this process, you will need to submit an SVG file of your brand logo, and obtain a PEM file referencing the SVG file from the issuer service.
3 Upload the VMC to your server
After you obtain the PEM file from the Certificate Authority (CA) of your choice, you will need to upload it to your web server so that it becomes accessible to anyone.
Note that your web server must be secured with HTTPS, and the url to the PEM file must start with https://, otherwise it will fail.
As a result, you will get a url to the PEM file that looks like:
https://yourserver.com/vmc.pem4 Upload your brand logo
Similar to the PEM file, you need to upload your brand logo, in SVG format, to a server so that it's accessible from anywhere.
As a result, you will get a url to the logo that looks like:
https://yourserver.com/logo.svgWe will need this url when creating a BIMI record in step 5.
5 Create a BIMI record
Similar to DMARC records, a BIMI record is a string that consists of multiple tags, separated by semicolons.
There are 2 mandatory tags in a BIMI record: v and l.
The v tag specifies the BIMI version. Currently it must be BIMI1.
The l tag specifies the logo url.
The a tag contains the url of the VMC PEM file. This tag is required by some mailbox service providers like Gmail.
Here is an example BIMI record that specifies the logo SVG and the PEM file uploaded:
v=BIMI1; l=https://yourserver.com/logo.svg;a=https://yourserver.com/vmc.pemOne thing to note here is that the content of the SVG that is referenced in the BIMI record should be identical to that of the SVG file that is referenced in your PEM file. Otherwise, BIMI can fail.
6 Publish your BIMI record in the DNS
A BIMI record is a TXT record published in the DNS at default._bimi.yourdomain.com.
A complete BIMI record in the DNS looks like this:
| Record Type | Name | Value | TTL |
|---|---|---|---|
| TXT | default._bimi | v=BIMI1; l=https://yourserver.com/logo.svg;a=https://yourserver.com/vmc.pem | Default |
7 Check the BIMI record
It's always a good idea to check the validity of your BIMI record after you publish it.
You can use our free BIMI record checker to check if the BIMI record has been published correctly on your domain. Simply enter your domain and hit the Check Domain button.
For example, checking BIMI on cnn.com returns:
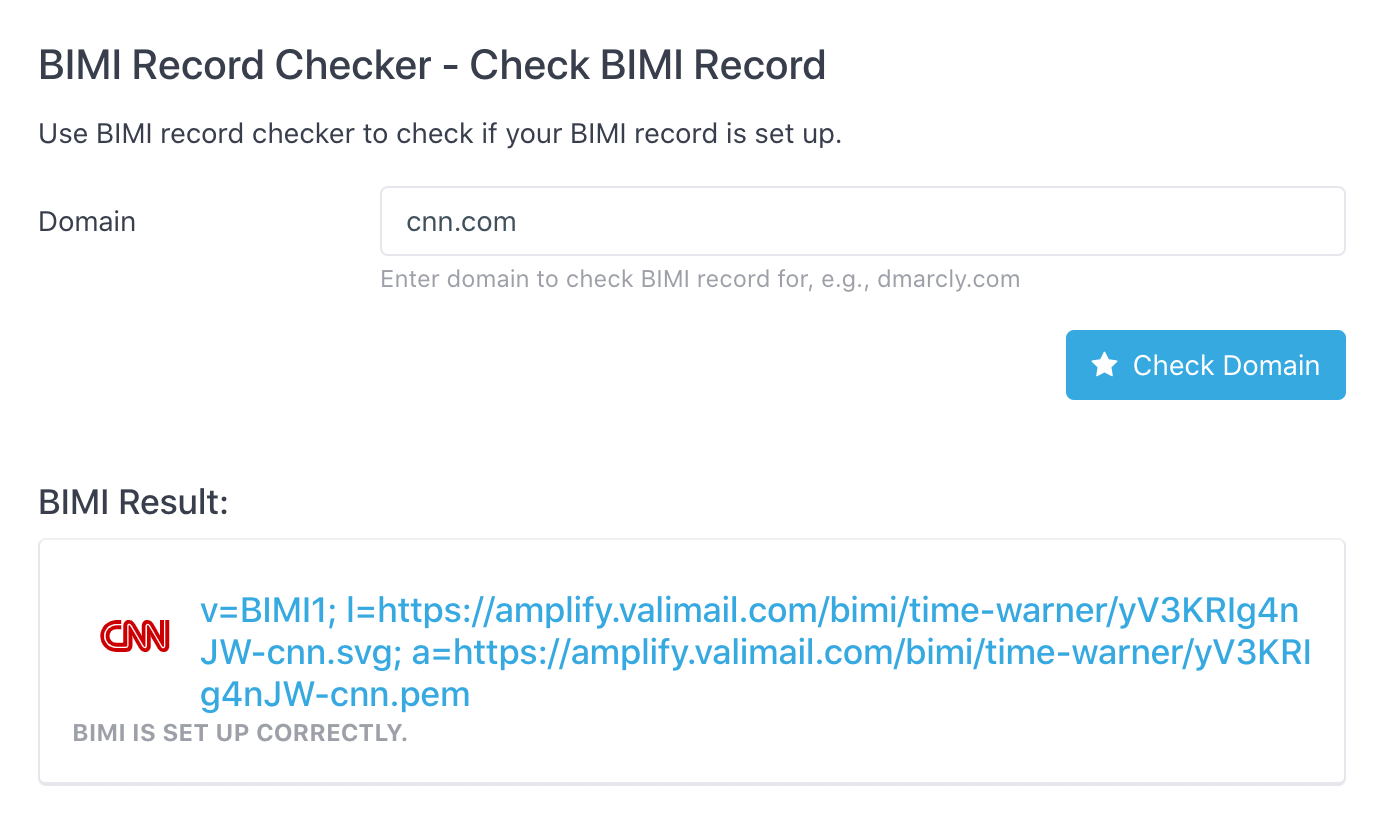
If BIMI is set up, the checker will fetch the logo and display it, as shown above.
It can take up to 48 hours before BIMI displays your brand logo in the mailbox, if set up correctly.
That's it! You've successfully implemented BIMI on your domain.

Protect Business Email & Improve Email Deliverability
Get a 14 day trial. No credit card required.
Create Account