How to Set Up DMARC, DKIM, and SPF in Office 365 (O365) Exchange Server: the Complete Implementation Guide
Table of Contents

It's critically important for any company using Office 365 Exchange Server for email to implement DMARC, DKIM, and SPF to prevent or stop email spoofing and phishing as well as improve email deliverability.
Office 365 has become the de facto standard for productivity software. Millions of companies use Office 365 everyday to send business emails. If your company:
- sends outbound emails from Office 365 (Exchange Online);
- uses Office 365 initial domain or your own custom domain to send emails;
- uses on-premises Microsoft Exchange Server, cloud-based Office 365 or a hybrid environment.
and wants to set up DMARC, DKIM and SPF to stop email spoofing and email phishing for your customers and employees, this guide is for you.
Typical Office 365 email scenarios
The path an email message takes from the internet to a mailbox and vice versa is called mail flow in Office 365 Exchange Server. Office 365 offers great flexibility in handling how emails are delivered to your organization's mailboxes.
The following mail flow scenarios are supported in Office 365:
- you host all your mailboxes in Office 365 and use all spam and malware filtering solutions offered by Office 365;
- you host all your mailboxes in Office 365, while using a 3rd-party cloud solution for filtering spam and malware, archiving and auditing;
- you keep your own mailboxes on your own organization's server, aka on-premises server; you want to use Office 365's spam filtering service, and send emails from your on-premise server via Office 365;
- you have mailboxes on your on-premises server as well as in Office 365; you want to use filtering and compliance solutions in the on-premises environment for all email messages; all email messages, both inbound and outbound, must route through your on-premises servers;
- you have mailboxes on your on-premises server as well as in Office 365; you want to use a 3rd-party solution for spam filtering; you want to route your outbound email messages through Office 365 to protect your on-premises servers' IP addresses from being blacklisted;
- all your mailboxes are hosted in Office 365, but you have a multifunction printer, scanner, or fax machine that needs to send emails;
- all your mailboxes are on-premises, and you use Exchange Online Protection (EOP) to protect your email.
The steps described in this article apply to all of the scenarios above, unless otherwise noted.
How MX records work
MX stands for "mail exchanger". An MX record is a type of DNS record on a domain. MX records provide an easy way for mail servers to know where to send emails.
When someone requests to send an email message to support@microsoft.com, the outgoing email server needs to:
- look up the DNS for the MX records on microsoft.com, the domain of the recipient email address;
- look up the domain names of the MX records in DNS to get their IP addresses;
- send the email to the IP address of the domain name of the highest priority.
For example, the following command to query the MX record on microsoft.com reveals that microsoft.com's mail exchanger is microsoft-com.mail.protection.outlook.com:
nslookup -q=mx microsoft.com

Non-authoritative answer:
microsoft.com   mail exchanger = 10 microsoft-com.mail.protection.outlook.com.
Assuming microsoft-com.mail.protection.outlook.com's IP address is 104.47.54.36, this means that all emails directed to microsoft.com, including the one to support@microsoft.com aforementioned, are sent to the server at the IP address of 104.47.54.36.
As can be seen from above, you are not limited to receiving incoming emails on an email server running on your organization domain. You can update your MX records on your domain to receive these incoming emails elsewhere. MX records provide a flexible way for domain owners to route emails directed to their domains to arbitrary hosts for processing.
Introduction to Office 365 mail flow
Office 365 uses domains, or more precisely, DNS records like MX records on domains to route emails messages.
After you sign up for Office 365 with your organization domain, say company.com, an default account that looks like admin@company.onmicrosoft.com is created for you. Although you can send/receive emails from this account, you might want to switch to your own domain, since that will look more professional.
Using your own domain to receive emails with Office 365 is a matter of updating the MX record on company.com to point to Office 365, like below:
Hostname: company-com.mail.protection.outlook.com
Priority: 0
TTL: 1 hour
How MX records affect spam filtering
Office 365 recommends that you point your MX record for your organization domain to Office 365. By doing so, Office 365 is able to check who is sending the message, the IP address of the server that originally sent the message, and the behavior of the connecting mail server, all of which help determine if an email is legitimate or spam. If your don't point the MX record to Office 365, some of the helpful information is lost, and Office 365's spam filter won't be as effective: there will be some valid messages that the service incorrectly classifies as spam and some spam messages that the service incorrectly classifies as legitimate emails.
Set up SPF in Office 365
Setting up SPF in Office 365 means you need to create an SPF record that specifies all your legitimate outgoing email hosts, and publish it in the DNS.
You will also need to watch out for the condition where you SPF record contains more than 10 DNS lookups, and take action to fix it when it happens.
What is SPF?
The first player in the modern email authentication trio is Sender Policy Framework (SPF), which first appeared in the early 2000s.
SPF is an email authentication mechanism which allows only authorized senders to send on behalf of a domain, and prevents all unauthorized users from doing so. SPF enables the receiving email server to check that an email claiming to come from a specific domain indeed comes from an IP address authorized by that domain's administrator.
SPF is defined in RFC 7208, and more information can be found at www.open-spf.org.
How SPF works
In order to facilitate our discussion, let's assume this setup:
- your business domain is business.com; you will send emails to your employees and customers from
support@business.com; - your email delivery host, which sends the email for you, has an IP address of
192.168.0.1; - some attacker uses a scam email server at IP address
1.2.3.4to try to send spoofed emails.
When an email delivery service connects to the email host serving up the recipient's mailbox:
- the email server extracts the domain name from the envelope from address; in this case, it's
business.com; - the email server checks the connecting host's IP address to see if it's listed in
business.com's SPF record published in the DNS. If the IP address is listed, the SPF check passes, otherwise not.
For example, let's say your SPF record looks like this:
v=spf1 ip4:192.168.0.1 -allit means only emails from IP address 192.168.0.1 can pass SPF check, while all emails from any IP address other than 192.168.0.1 will fail. Therefore, no email from the scam server at IP address of 1.2.3.4 will ever pass SPF check.
Think of the SPF record as a whitelist of legitimate IP addresses, and only when an incoming email is from one of the IP addresses, SPF gives the green light. No other hosts are able to send emails using your domain. The SPF authentication result is then used for DMARC authentication later.

Create an SPF record for Office 365
Depending on the actual outbound email scenario you are in, create your SPF record accordingly.
Scenario 1: you only use Office 365 Exchange Online to send emails on behalf of your organization.
In this scenario, since only Office 365 is allowed to send emails, just include its SPF record (spf.protection.outlook.com) in your SPF record, like this:
v=spf1 include:spf.protection.outlook.com –allScenario 2: you currently send emails from your on-premise email server; you also want Office 365 to send emails on your behalf.
In this scenario, if you already have an existing SPF record like v=spf1 mx –all, all you need to do is to include the Office 365 SPF record in yours like this:
v=spf1 mx include:spf.protection.outlook.com –allIf you don't have an SPF record yet, simply use the record in scenario 1.
Scenario 3: you have delegated email delivery to a 3rd-party service like SendGrid, now you want Office 365 to send emails for your organization as well.
Suppose you have an SPF record like v=spf1 include:sendgrid.net –all, simply include the Office 365 SPF record like this:
v=spf1 include:sendgrid.net include:spf.protection.outlook.com –allIf you don't have an SPF record yet, simply use the record in scenario 1.
A better way to create your SPF record is to use DMARCLY's online SPF record generator. This will eliminate many common errors caused by manually creating it.
Office 365 allows you to tweak you spam filter settings, so that Office 365 Exchange Online will mark emails which hardfail SPF check as spam.
To accomplish this in the Exchange Online admin center, go to protection > spam filter > advanced options, turn the switch SPF record: hard fail to On, then click Save.
Alternatively, you can run the following cmdlet in PowerShell on your default policy:
Get-HostedContentFilterPolicy | Where-Object {$_.IsDefault -eq $true} | Set-HostedContentFilterPolicy -MarkAsSpamSpfRecordHardFail OnPublishing an SPF record
Once you've created the SPF record, you need to publish it to the DNS before the receiving email server can pick it up. Publishing an SPF record is a matter of creating a TXT record on your domain.
Let's assume you are using GoDaddy as your domain hosting service. If you are using another domain hosting service, the UI should be similar.
Here are the steps:
-
Log in to GoDaddy. Click the domain in question, then click the DNS button.

-
If you've never created an SPF record on the domain before, click the Add button under the Records section.

- Otherwise you already have an existing SPF record, edit it instead. To check if there is any SPF record, try to find a TXT record with a value starting with
v=spf1. -
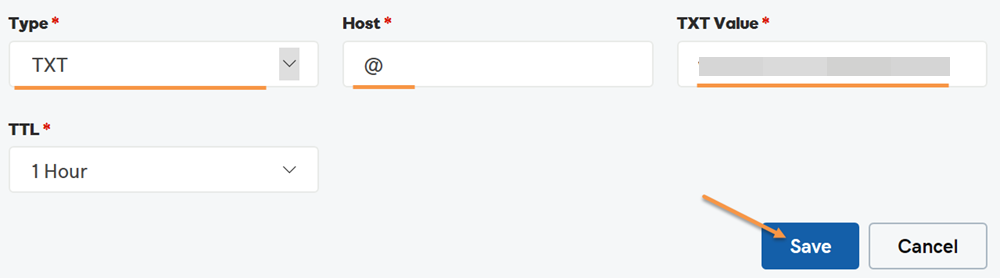
Select TXT for the Type drop-down menu. Enter @ for the Host field. Enter the SPF record as the TXT Value. Then click the Save button.
Now you have published the SPF record. Note that if you check the newly published SPF record, it might take up to 1 hour before it appears in whatever tool you use to check it, due to DNS propagation.
SPF DNS lookup limit
Each time an email message hits the email service host, the host looks up in the DNS to perform SPF check. Care has been taken to prevent this from turning into Denial of Service (DoS) attack.
The SPF specification imposes that the number of mechanisms and modifiers that do DNS lookups must not exceed ten per SPF check, including any lookups caused by the use of the "include" mechanism or the "redirect" modifier. If this number is exceeded during a check, a PermError is returned.
The include, a, mx, ptr, and exists mechanisms as well as the redirect modifier do count against this limit. The all, ip4, and ip6 mechanisms do not require DNS lookups and therefore do not count against this limit. The exp modifier does not count against this limit because the DNS lookup to fetch the explanation string occurs after the SPF record has been evaluated.
Refer to SPF DNS Lookup Limit for more information.
What if your SPF record exceeds the 10-DNS-lookup limit?
If your SPF record exceeds the 10-DNS-lookup limit, SPF authentication returns a permanent error indicating "too many DNS lookups". An SPF permanent error is interpreted in DMARC as fail. Therefore, when this happens, it has a negative impact on your email deliverability.
I suggest that you use the free SPF record checker to check the DNS lookup count of the SPF record on your domain to make sure it stays below 10. If the number goes beyond 10, you need to "flatten" your SPF record so that all your legitimate emails can land in the inbox as desired.
Manually flattening your SPF record is both error-prone and tedious, and it's recommended to use a tool to automate this process. DMARCLY's has a purpose-built feature called Safe SPF which full automates SPF record flattening.
For a more thorough discussion on this topic, refer to: SPF PermError: Too Many DNS Lookups - When SPF Record Exceeds 10-DNS-Lookup Limit
Set up DKIM in Office 365
Setting up DKIM in Office 365 means creating 2 DKIM records, publishing them in the DNS, and enabling DKIM in the Exchange admin center.
Create DKIM records for Office 365
In order to set up DKIM in Office 365, first you need to create 2 CNAME-typed DKIM records on each domain. These records look like the following:
Host name: selector1._domainkey.CompanyDomainName
Points to: selector1-CompanyDomainName-com._domainkey.TenantName.onmicrosoft.com

Host name: selector2._domainkey.CompanyDomainName
Points to: selector2-CompanyDomainName-com._domainkey.TenantName.onmicrosoft.com
For example, if your company's domain name is company.com, and you have signed up for Office 365 as company, you need to create these 2 DKIM records:
Host name: selector1._domainkey.company.com
Points to: selector1-company-com._domainkey.company.onmicrosoft.com

Host name: selector2._domainkey.company.com
Points to: selector2-company-com._domainkey.company.onmicrosoft.com
Note that in the above Points to values, the CompanyDomainName should match the domain part of the MX record that is generated by Office 365. In this case, company-com in the Points to value should match company-com in company-com.mail.protection.outlook.com.
After you have published the records, give it some time (~10 minutes) for the records to propagate in the DNS.
Enable DKIM signing in Office 365
Next you need to enable DKIM signing in Office 365. Log into the Exchange admin center, then go to protection > dkim, choose the domain you want to enable DKIM on, then click Enable on the right pane.
Note that if the 2 DKIM records you published in the DNS haven't taken effect yet, this operation will fail. When this happens, wait some time and try again. If you keep getting this error, check if your DKIM records are published correctly.
Set up DMARC in Office 365
Setting up DMARC in Office 365 involves creating a DMARC record, publishing to the DNS, receiving and analyzing the reports, and taking appropriate action.
Creating a DMARC record
To start implementing DMARC, you need to create a DMARC record.
First identify the email domain you send business emails from. For example, if you use an address sales@mycompany.com to send sales emails to prospects, the domain is mycompany.com.
Then log in to the DMARCLY dashboard, go to DNS Records -> Publish DMARC Record. The default DMARC record has already been created for you in the highlighted area, as below:

Note that there is a section below on the page where you can customize your settings for the DMARC record. The most important setting is the policy which instructs the receiving server how to handle emails that fail DMARC authentication.
Here we set the policy to None (p=none) by default, which means we put DMARC in the monitoring mode, so that you can examine the percentages of emails that pass/fail DMARC authentication.
When in the monitoring mode, the receiving server doesn't quarantine/reject failing emails, and everything works just like before from your customers' perspective. The monitoring mode gives you one benefit: you will receive DMARC aggregate reports from now on, and gain visibility into deliverability of your email program.
If you are just getting started with DMARC, you can safely ignore these settings for now. You can always come back and change the settings whenever necessary.
External destination verification
When you use a rua tag and publish a DMARC record like this:
v=DMARC1; p=none; rua=mailto:aggregate@reporting.com;you are requesting compliant email service providers to send aggregate reports to the specified email address aggregate@reporting.com. However, the owner of aggregate@reporting.com must grant you the permission before you can do so. Otherwise, these reports won't be sent to that particular email address. This is called external destination verification (EDV).
External destination verification works like this:
-
the owner of
reporting.compublishes an EDV record at:example.com._report._dmarc.reporting.comwith the value
v=DMARC1to the DNS, in order to enable EDV; - before an email service provider sends an aggregate report to
aggregate@reporting.com, it needs to check ifreporting.comhas allowed reports onexample.comto be sent to it. It does this by lookingexample.com._report._dmarc.reporting.comup in DNS. If this record exists, and it's value isv=DMARC1, the report will be sent; otherwise not.
Note that the above EDV record is per domain, i.e., it only allows reports on example.com to be sent to aggregate@reporting.com. If you want reports on anotherexample.com to be sent to aggregate@reporting.com, you will need to publish an EDV record for anotherexample.com.
If you want to allow reports on any domain to be sent to aggregate@reporting.com, publish a wildcard EDV record at:
*._report._dmarc.reporting.comIf you are using DMARCLY to process your DMARC reports, you don't need to worry about EDV - DMARCLY handles that for you.
Publishing a DMARC record
In order to put the DMARC record into action, you must publish it to the DNS.
Here is a refresher on why this is necessary: when an email arrives at the receiving server, the server extracts the domain from the email address, and looks the DMARC record up in the domain's DNS entry. If found, it performs the actions as specified in the DMARC record.
Now log in to your DNS management console, choose the domain you need to publish the DMARC record on, i.e., mycompany.com.
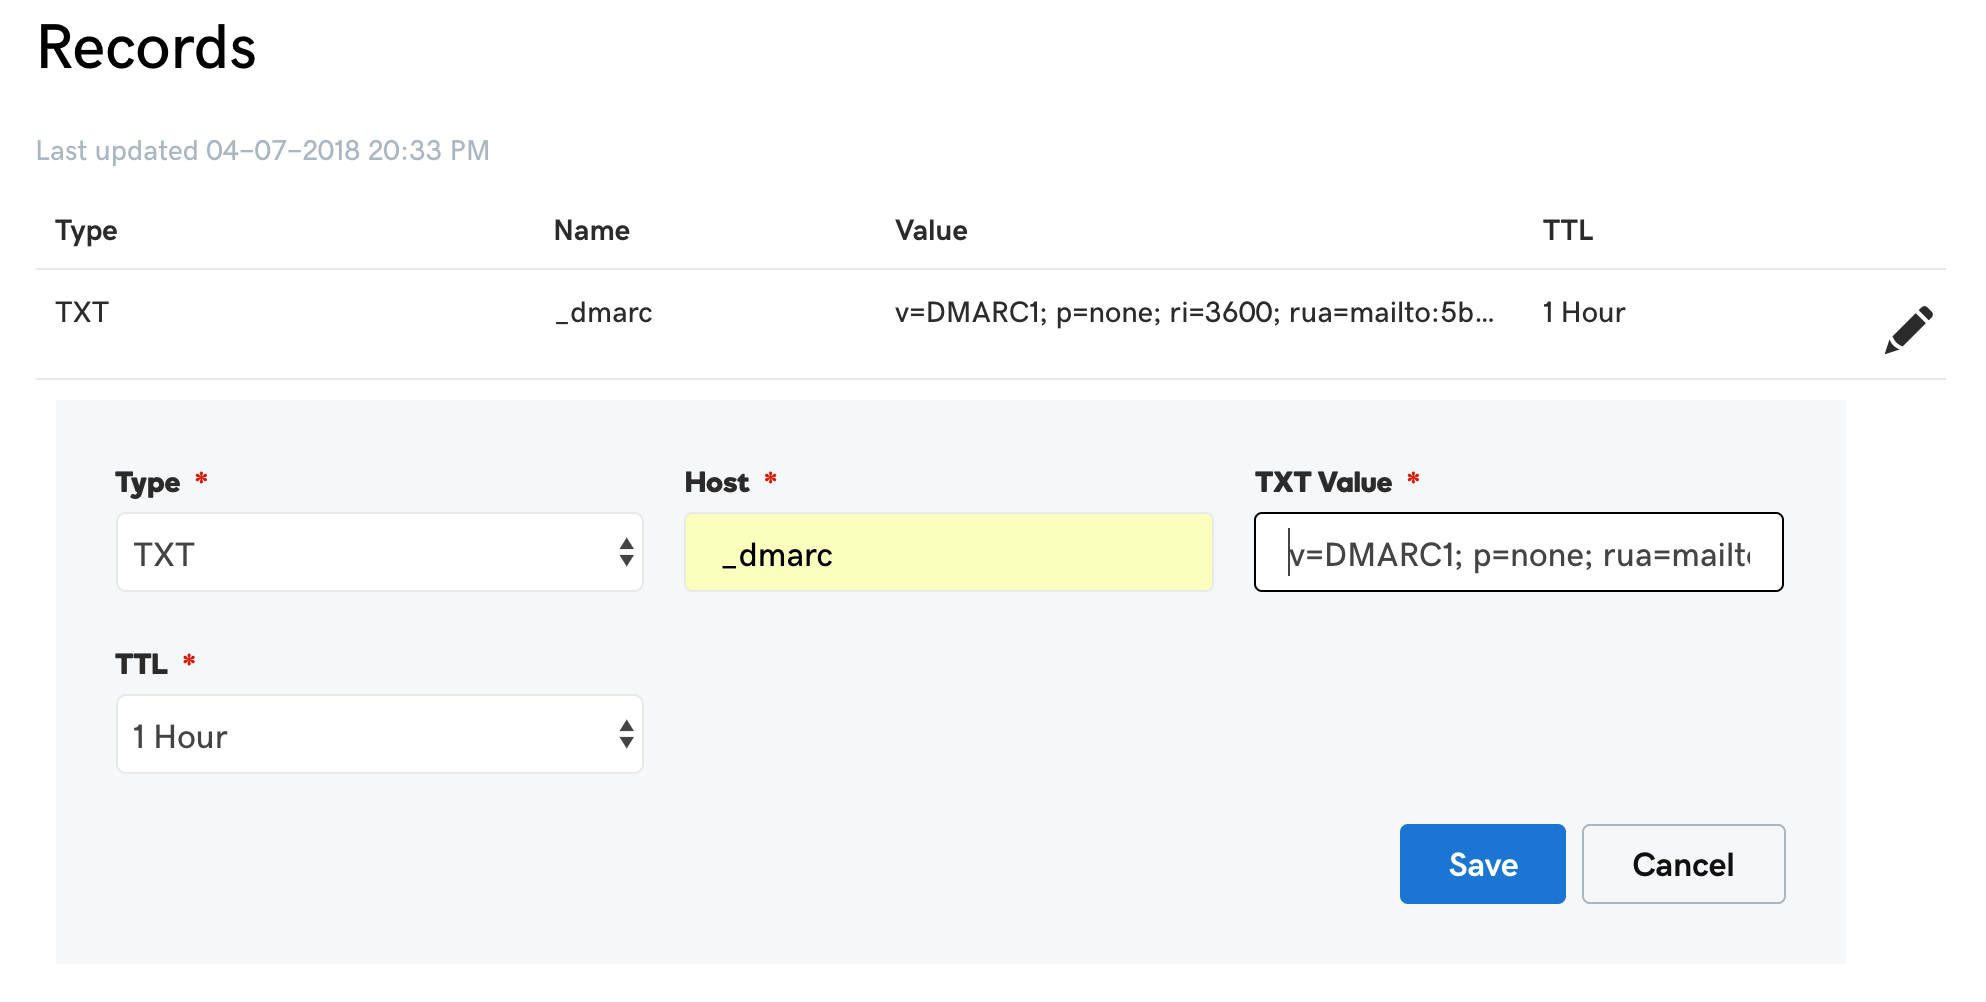
Create a TXT entry on mycompany.com with these settings:
Type: TXT
Host: _dmarc
TXT Value: (DMARC record created above)
TTL: 1 hour
For example, here is what it looks like in GoDaddy's DNS management console:
To publish a DMARC record in CloudFlare:

Now you have it! DMARC aggregate reports on that domain will drip in within a couple of days.
If you have multiple domains you want to secure, repeat the steps for each of the domains.
DMARC reports
DMARC can send 2 types of reports upon request: aggregate reports and forensic reports.
DMARC aggregate reports provide information about percentages of email passing/failing SPF, DKIM and DMARC checks.
Although they do not come with much information about individual email messages, aggregate reports can provide valuable visibility into the health of your email program, and help you identify potential authentication issues and/or malicious activity.
You can use the rua tag in the DMARC record to specify the recipient of aggregate ports.
For example, the following rua tag requests the ESP to send aggregate reports to 5b06a123419ab@ag.dmarcly.com:
rua=mailto:5b06a123419ab@ag.dmarcly.comIn contrast, DMARC forensic reports are generated by email service providers almost immediately after an email message fails DMARC authentication. The forensic report contains message header fields, including source IP, authentication results, To and From email addresses, as well as the message body.
You can use the ruf tag in the DMARC record to specify the recipient of forensic ports.
For example, the following ruf tag requests the ESP to send forensic reports to 5b06a123419ab@fo.dmarcly.com:
ruf=mailto:5b06a123419ab@fo.dmarcly.comDMARC reporting workflow
Setting up DMARC reporting is the first step towards a full-scale DMARC implementation.
To set up DMARC reporting, you need the following:
- set up mailboxes to receive aggregate and forensic reports;
- publish a DMARC record;
- parse the reports that come along with email messages into data;
- render the data into charts.
This might seem like quite a bit of work to many, especially considering some of the tasks are repetitive on a daily basis. Some DMARC analytics tools that can automate these tasks exist on the market, though. For example, DMARCLY can handle this heavy lifting for you.
Analyzing aggregate reports
DMARC aggregate reports are encoded in XML format, which is a data format easy for machines to parse, while time-consuming for humans to read.
Here is an example aggregate report:
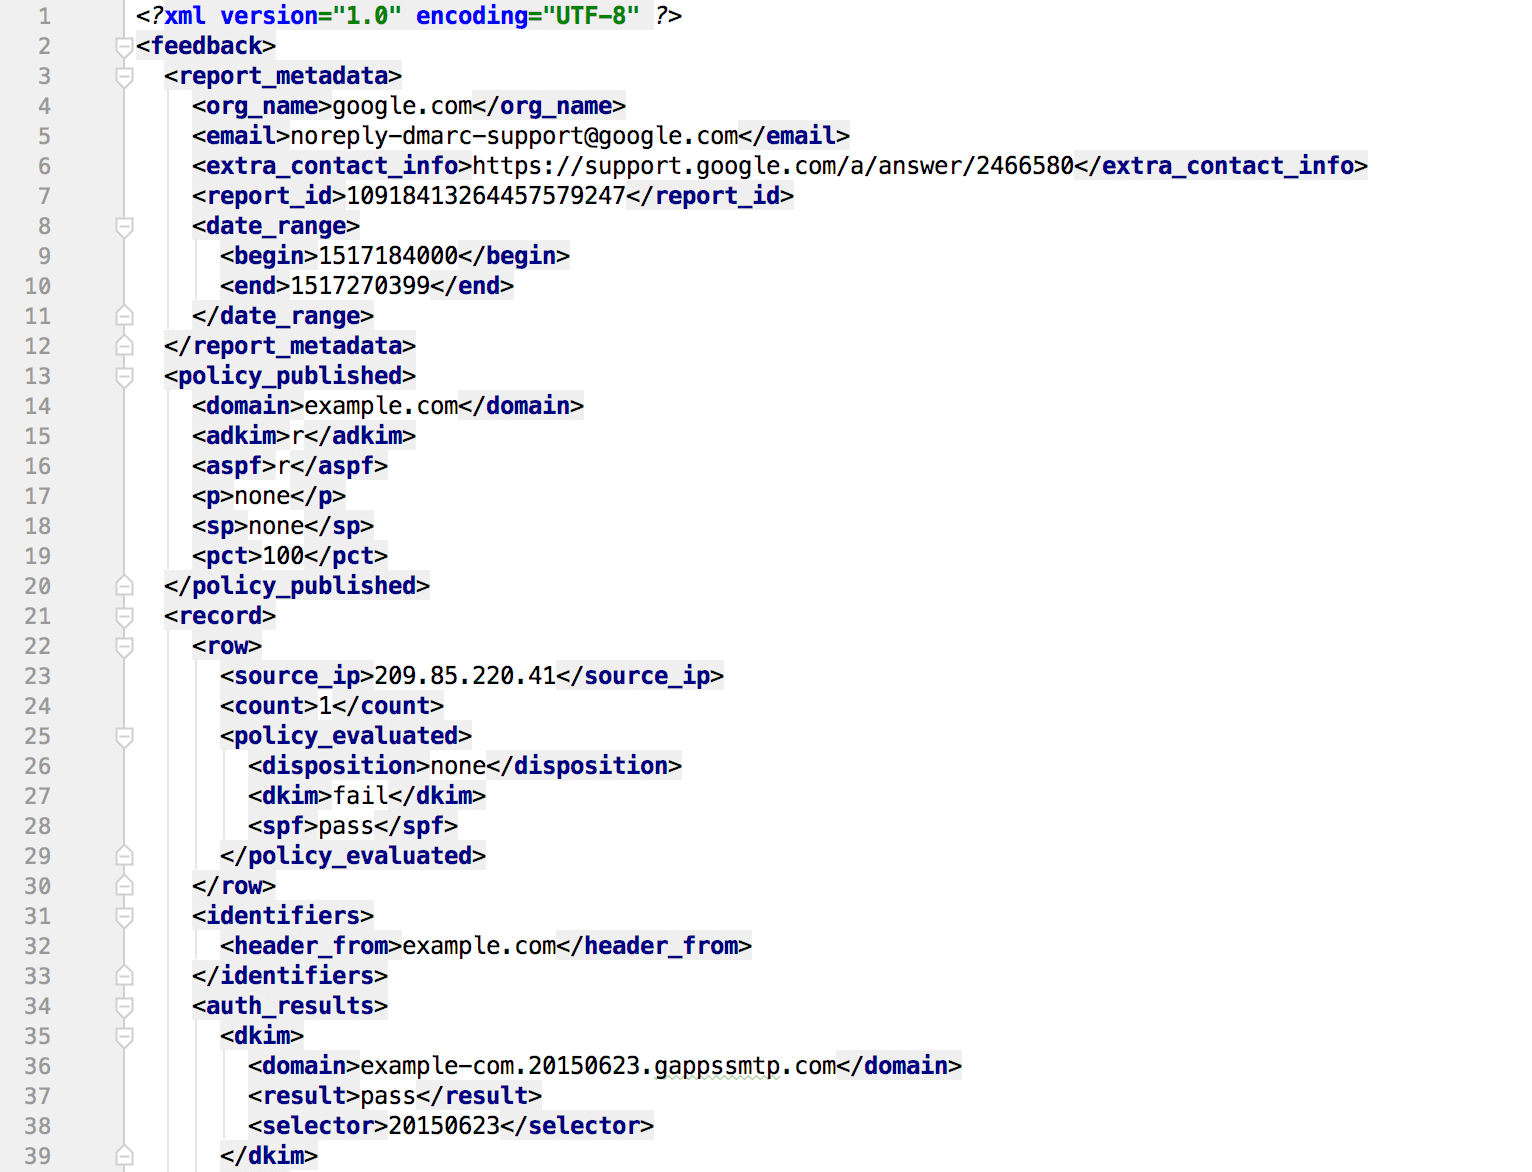
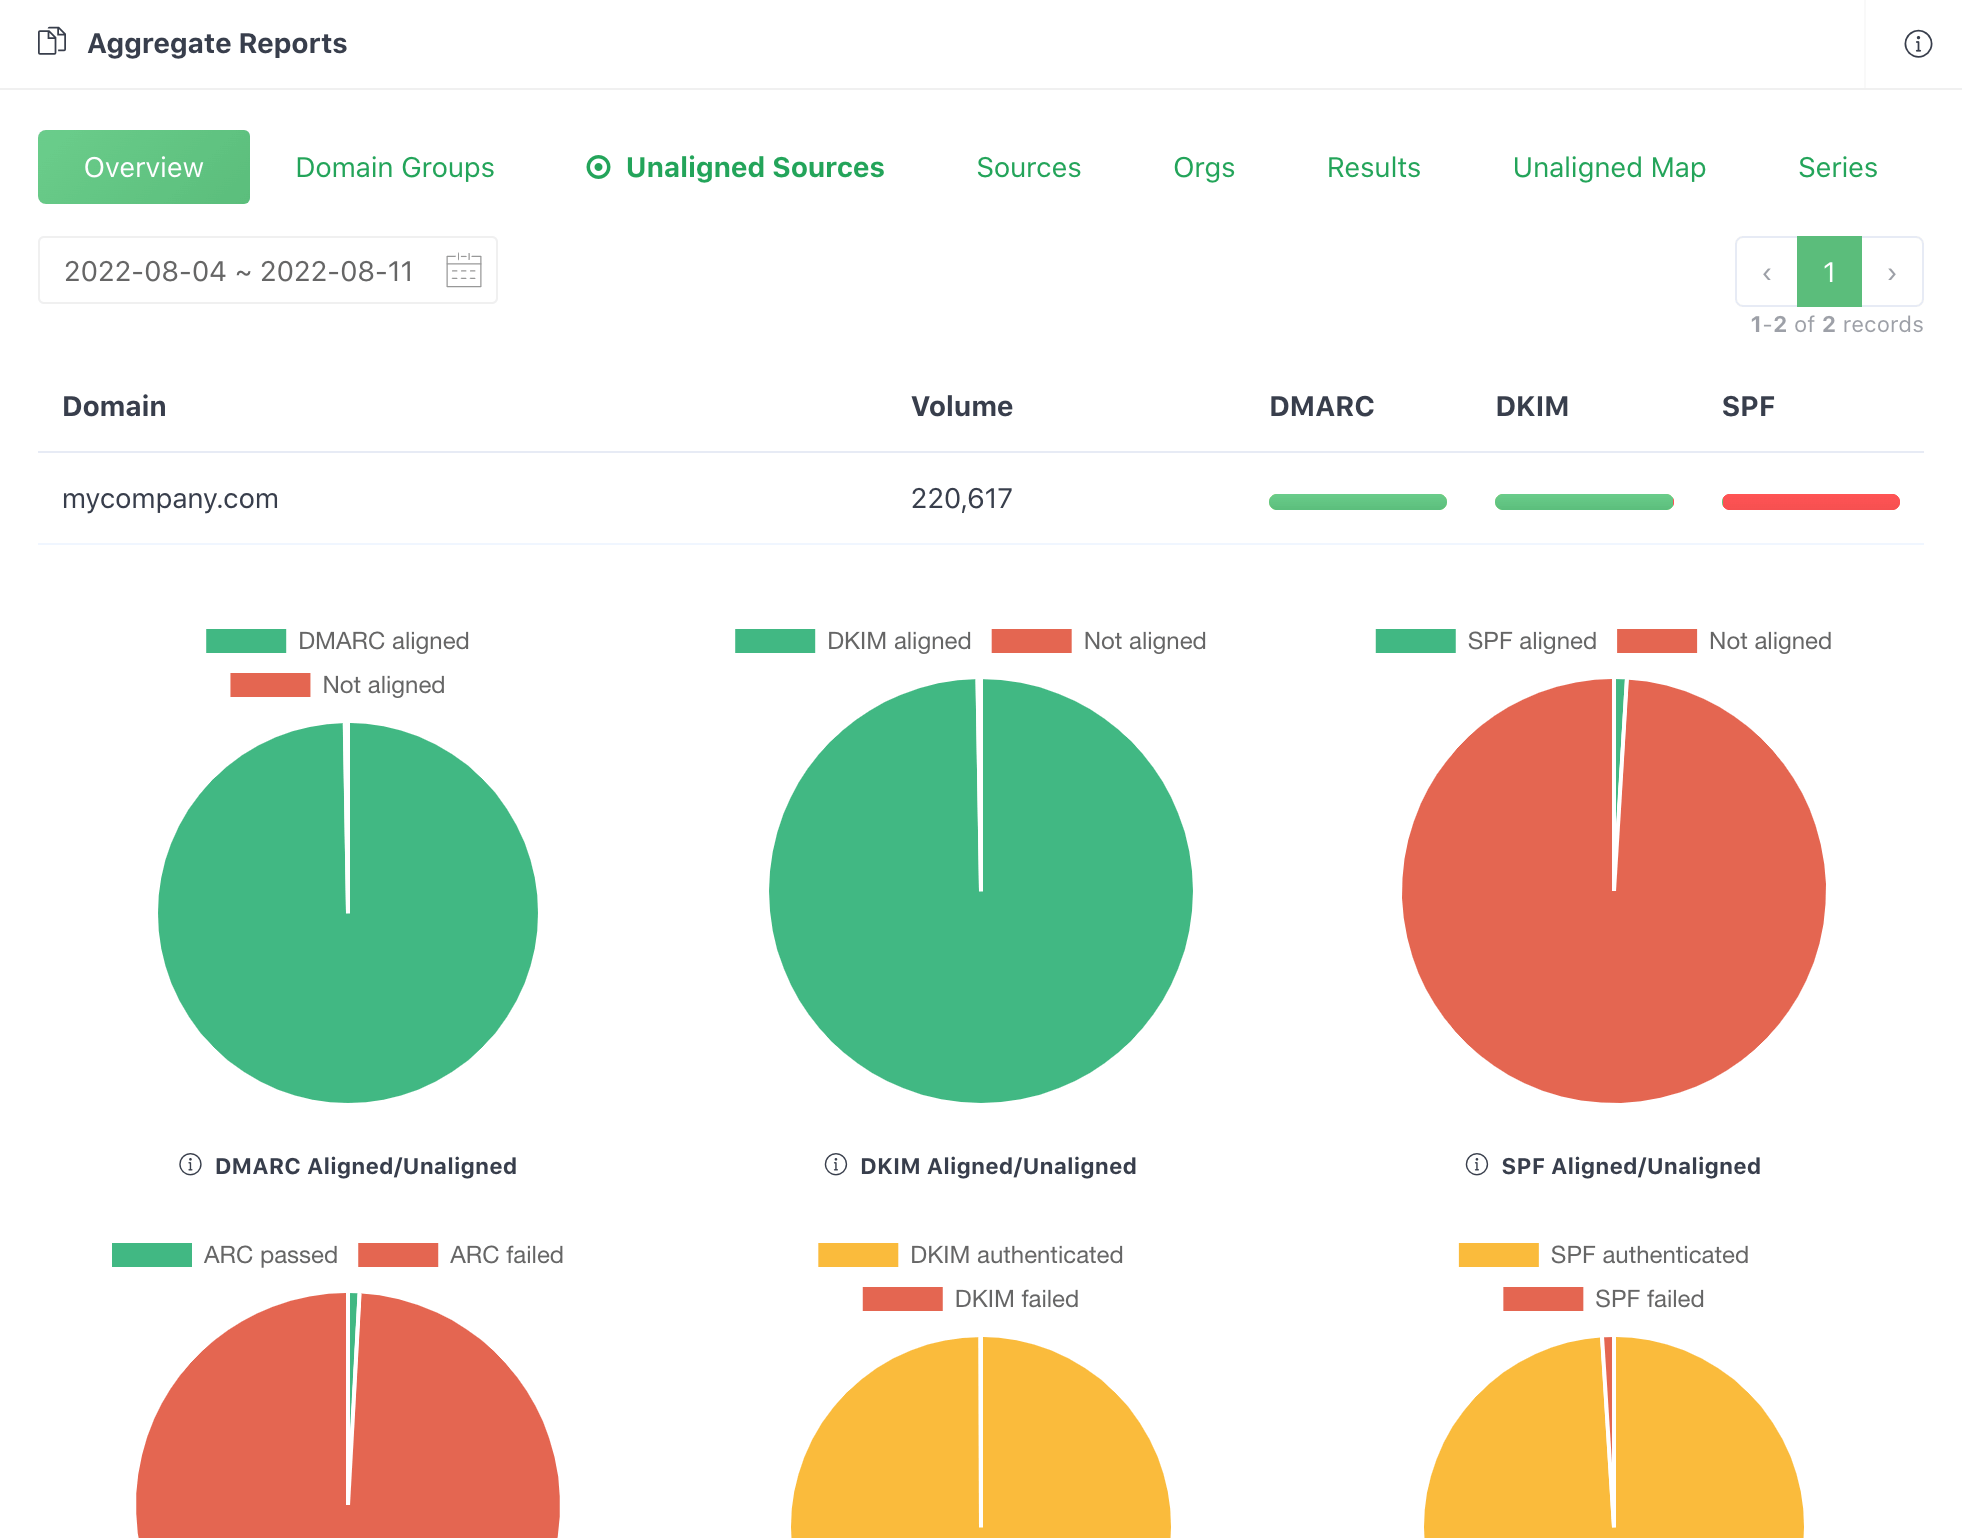
Manually parsing such data is not much fun and error-prone, especially if you have to do this many times every day. It'd be wise to use a DMARC analytics service to automate this process for you. Here is what it looks like after DMARCLY parses a series of aggregate reports and render them as easy to understand charts.
Updating email streams
The main purpose of analyzing DMARC reports is to identify those email sources which fail SPF or DKIM authentication but are actually legitimate, that is, email hosts that are part of your email infrastructure.
Here is a example list of unaligned sources:
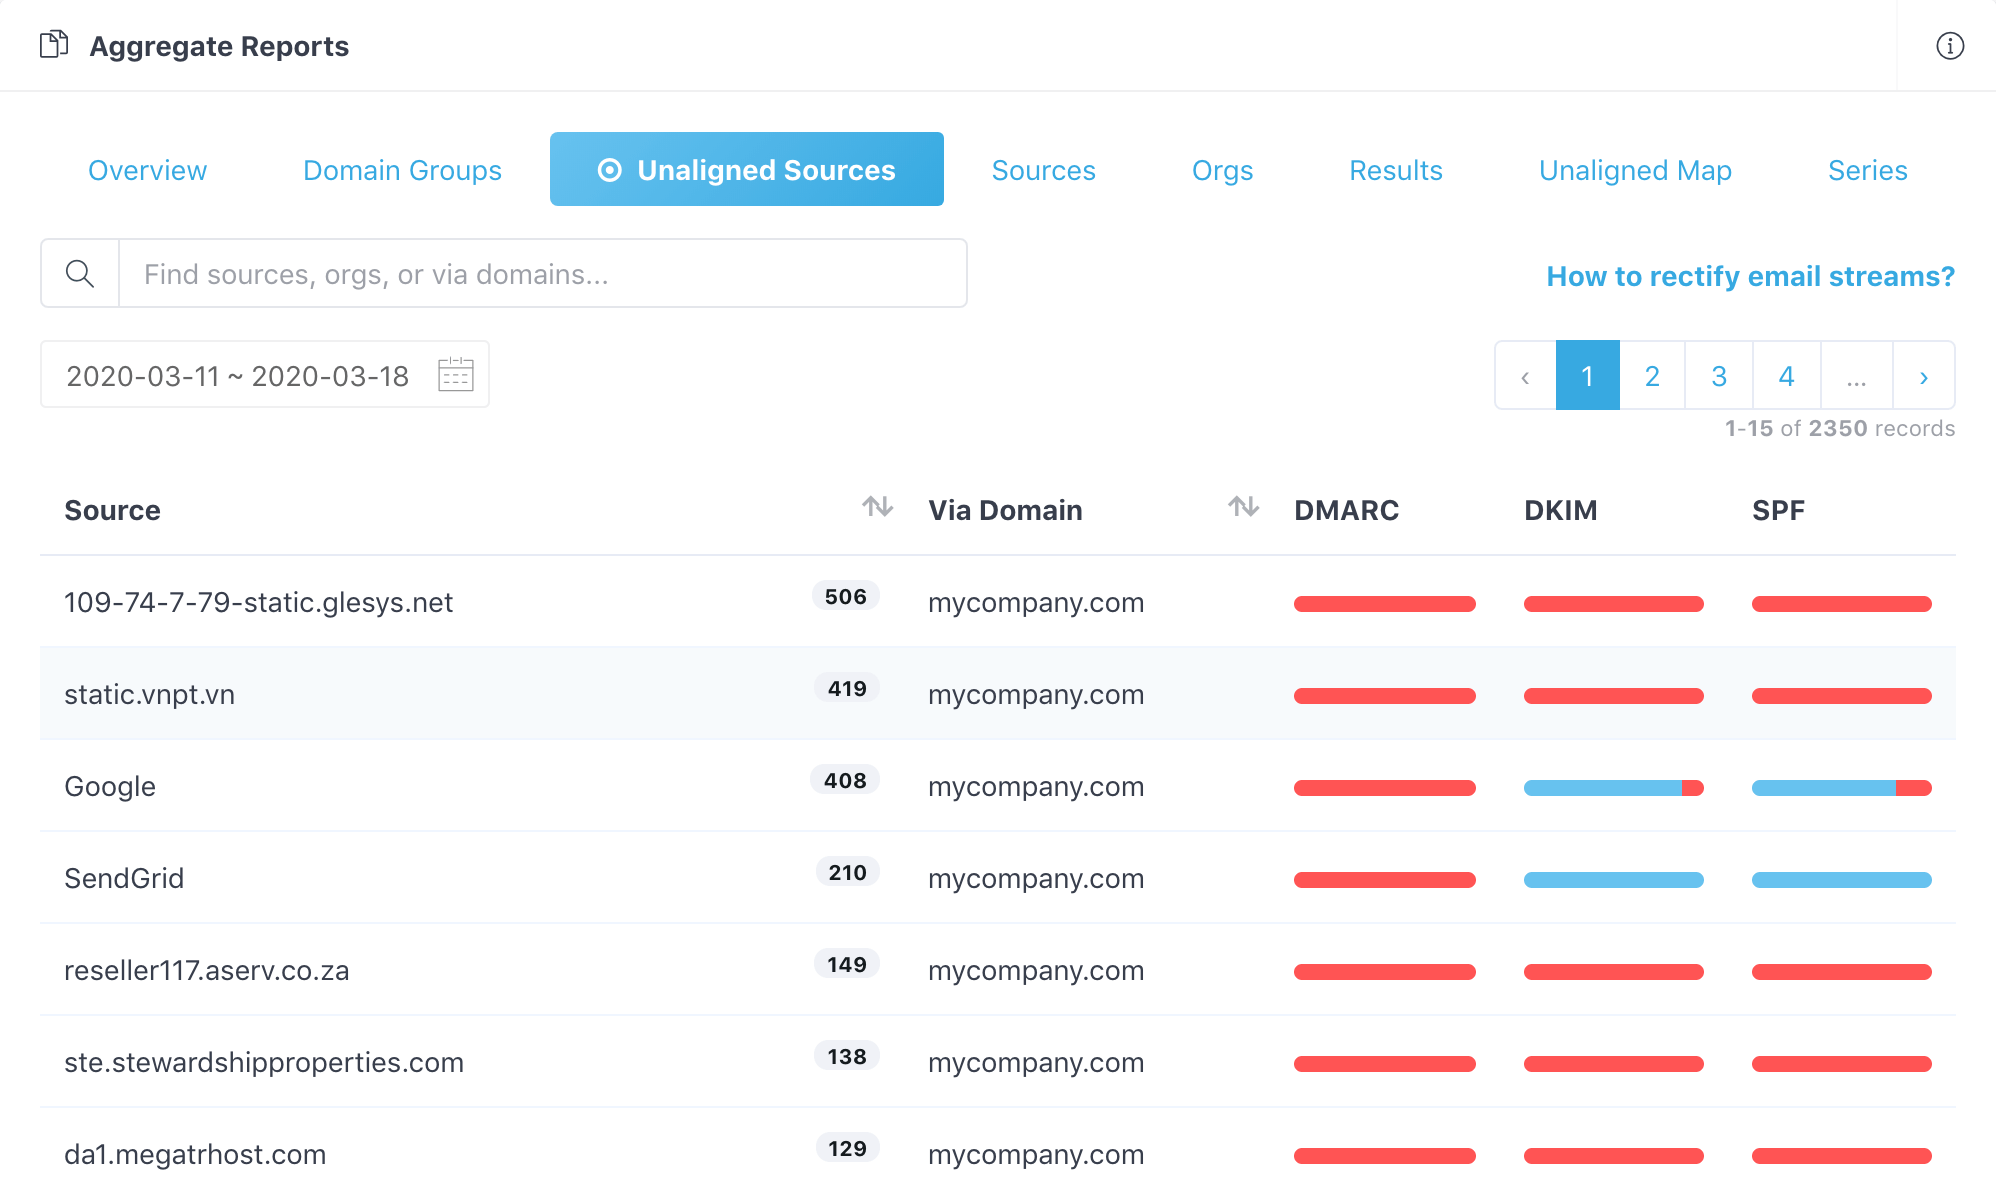
After you identify these failed legitimate email senders, update your SPF/DKIM settings so that emails from them pass authentication next time.
For example, if you use Mailchimp to deliver emails, and it's being listed as an unaligned source here, Mailchimp is a legitimate yet unauthenticated email stream. Now you need to rectify the Mailchimp email stream. In other words, set up SPF and DKIM for Mailchimp.
Setting up SPF and DKIM is very similar for various email delivery services. Here is a guide to setting up SPF and DKIM for Mailchimp.
If you are using other email delivery services, try to look up their documentation.
On the other hand, remove hosts that are not supposed to send emails on your behalf, but are passing authentication, if any.

Protect Business Email & Improve Email Deliverability
Get a 14 day trial. No credit card required.
Create Account